Adjusting the Radiant Floor Manifold
Hello Everyone,
I live in a Rummer in Oak Hills. I was wondering if anyone could answer the below question pertaining to the radiant heating system.
I am trying to balance my heating system a little better using the adjustments on the manifold valves. I can't remember exactly how to do it or if there are any tricks to shorten the test cycle of which valves go to which rooms (my valves were never labeled).
Has anyone ever swapped out a different adjustment valves for the heating system?
Thanks in advance
MM
I sure wish we knew how!! A few years ago when we had the annual furnace check we had the repairman adjust the valves. Since then we have NO heat in 3 of the bedrooms. Last year we requested some heat, please, in those rooms. The serviceman just said that in these Rummer houses sooner or later the heat no longer goes to rooms far from the furnace. I can't believe this. Any help out there?
RC and MC
Hi MM,
We have the same issue with two of our rooms and we have had multiple service people come out and give multiple solutions. The best solution we found was from Larry & Chuck's Heating Inc (503) 232-5747. They were referred to us by a friend of a friend who had work done and were happy with the results. I had a long conversation with them and they seem very confident about balancing the Rummer heating system. That said, we have not yet enlisted their services, so I can't speak from experience.
TS
Hello all,
My wife and I are new to this list, but we've owned our Rummer (near vista Brook) for 16 years. Our neighbor had his house custom built by Bob Rummer, in '68, and has taught me a lot.
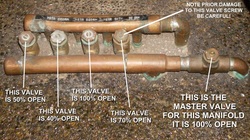
For starters, some of you may not know exactly how the little manifold valves work. They go from completely on to completely off with only a 90 DEGREE turn. When the slot in the adjusting screw is PERPENDICULAR to the little cross pipe it is mounted on, the valve is OFF (that room gets little or no hot water). When the slot is PARALLEL to the little cross pipe it is on, the valve is fully OPEN (that room gets full circulation) See the attached picture.
((((((((((( Rummer Floor Valves.jpg (142KB) View Image ))))))))))))))
Adjusting each valve requires two tools - an adjustable wrench (10" or 12" is best) and a large standard screw driver. It's like adjusting the valve clearance on an older car, for those of us who remember -- you'll wish you had three hands ! Use the adjustable wrench to turn the large hex "collar nut" counter clockwise about 1/4 to 1/2 turn. Some water will weep out slowly, so have an old towel handy. Once the collar nut is loosened, use the large screw driver to turn the center screw, WHILE HOLDING THE COLLAR NUT WITH THE WRENCH. Then, tighten the collar nut, while ending up with the slot of the screw in the desired position. It takes a little fiddling to accomplish, and sometimes a few tries...
The valves can become stuck and very difficult (or impossible) to turn. Do not force them, the brass "ears" that form the slot for a screw driver can easily be broken, rendering the valve useless. The only solution for freeing stuck valves is to depressurize/drain the system - take them completely apart, soak them in solvent, and reassemble them. I now do this every couple of years to keep them working properly.
I have a four bedroom house, and three separate manifolds: One in the garage controls the whole house perimeter, plus the kitchen, family room, dining room and living room (2 circuits). One in the hall coat closet controls the master bedroom (2 circuits), plus the master bath and closest bedroom). A third set in the front corner bedroom closet controls that bedroom, the second bath and the adjacent fourth bedroom.
Figuring out which valves control which rooms is relatively simple, providing the valves can be turned on an off easily. Let the slab cool, turn off all but one valve, crank up the system and walk around barefoot. You'll feel the hot water within about 10 - 20 minutes. Stay away from the outside walls, as the whole house probably has a perimeter circuit - mine is controlled by one valve in the garage.
As for adjusting and balancing, that is tricky, but can be done. Lots of patience and fiddling - lots of thermometers in individual rooms... One thing that doesn't seem intuitive is that a partially closed valve makes a room warmer than one that is fully open (especially in a smaller room). The reason is that the water stays in the floor longer, and gives up more of its heat...
If you have cats, THEY know where the pipes are!
Also, some halways may always get heat, independent of valve adjustments - from the feeder pipes to the manifolds.
As for repalcing the valves, it's pretty involved. Jack hammering, finding all the loops, attaching between plastic and copper. Yuck - I gave up... If anyone has done this, I'd like to talk to you!
Feel free to give me a call if you'd like more info, or a clearer explanation!
Cheers!
RM
I live in a Rummer in Oak Hills. I was wondering if anyone could answer the below question pertaining to the radiant heating system.
I am trying to balance my heating system a little better using the adjustments on the manifold valves. I can't remember exactly how to do it or if there are any tricks to shorten the test cycle of which valves go to which rooms (my valves were never labeled).
Has anyone ever swapped out a different adjustment valves for the heating system?
Thanks in advance
MM
I sure wish we knew how!! A few years ago when we had the annual furnace check we had the repairman adjust the valves. Since then we have NO heat in 3 of the bedrooms. Last year we requested some heat, please, in those rooms. The serviceman just said that in these Rummer houses sooner or later the heat no longer goes to rooms far from the furnace. I can't believe this. Any help out there?
RC and MC
Hi MM,
We have the same issue with two of our rooms and we have had multiple service people come out and give multiple solutions. The best solution we found was from Larry & Chuck's Heating Inc (503) 232-5747. They were referred to us by a friend of a friend who had work done and were happy with the results. I had a long conversation with them and they seem very confident about balancing the Rummer heating system. That said, we have not yet enlisted their services, so I can't speak from experience.
TS
Hello all,
My wife and I are new to this list, but we've owned our Rummer (near vista Brook) for 16 years. Our neighbor had his house custom built by Bob Rummer, in '68, and has taught me a lot.
For starters, some of you may not know exactly how the little manifold valves work. They go from completely on to completely off with only a 90 DEGREE turn. When the slot in the adjusting screw is PERPENDICULAR to the little cross pipe it is mounted on, the valve is OFF (that room gets little or no hot water). When the slot is PARALLEL to the little cross pipe it is on, the valve is fully OPEN (that room gets full circulation) See the attached picture.
((((((((((( Rummer Floor Valves.jpg (142KB) View Image ))))))))))))))
Adjusting each valve requires two tools - an adjustable wrench (10" or 12" is best) and a large standard screw driver. It's like adjusting the valve clearance on an older car, for those of us who remember -- you'll wish you had three hands ! Use the adjustable wrench to turn the large hex "collar nut" counter clockwise about 1/4 to 1/2 turn. Some water will weep out slowly, so have an old towel handy. Once the collar nut is loosened, use the large screw driver to turn the center screw, WHILE HOLDING THE COLLAR NUT WITH THE WRENCH. Then, tighten the collar nut, while ending up with the slot of the screw in the desired position. It takes a little fiddling to accomplish, and sometimes a few tries...
The valves can become stuck and very difficult (or impossible) to turn. Do not force them, the brass "ears" that form the slot for a screw driver can easily be broken, rendering the valve useless. The only solution for freeing stuck valves is to depressurize/drain the system - take them completely apart, soak them in solvent, and reassemble them. I now do this every couple of years to keep them working properly.
I have a four bedroom house, and three separate manifolds: One in the garage controls the whole house perimeter, plus the kitchen, family room, dining room and living room (2 circuits). One in the hall coat closet controls the master bedroom (2 circuits), plus the master bath and closest bedroom). A third set in the front corner bedroom closet controls that bedroom, the second bath and the adjacent fourth bedroom.
Figuring out which valves control which rooms is relatively simple, providing the valves can be turned on an off easily. Let the slab cool, turn off all but one valve, crank up the system and walk around barefoot. You'll feel the hot water within about 10 - 20 minutes. Stay away from the outside walls, as the whole house probably has a perimeter circuit - mine is controlled by one valve in the garage.
As for adjusting and balancing, that is tricky, but can be done. Lots of patience and fiddling - lots of thermometers in individual rooms... One thing that doesn't seem intuitive is that a partially closed valve makes a room warmer than one that is fully open (especially in a smaller room). The reason is that the water stays in the floor longer, and gives up more of its heat...
If you have cats, THEY know where the pipes are!
Also, some halways may always get heat, independent of valve adjustments - from the feeder pipes to the manifolds.
As for repalcing the valves, it's pretty involved. Jack hammering, finding all the loops, attaching between plastic and copper. Yuck - I gave up... If anyone has done this, I'd like to talk to you!
Feel free to give me a call if you'd like more info, or a clearer explanation!
Cheers!
RM
